Thursday, 6 April 2023

TOOLS WITHIN AUTODESK REVIT YOU MAY HAVE MISSED

When discussing with clients their Autodesk Revit issues and how to use it as efficiently as possible, I frequently notice that they are working on previous Revit versions. 2021 appears to be a common version among recent clients I've spoken with. Given that the current release is 2023.1, that's three updates since the version on which many projects are produced on.

These clients are frequently working on large projects that span several years, have multiple consultants collaborating on the project, and are the most difficult to upgrade, therefore are still using an older version.

However, there are times when an incidental issue arises, and I wonder to myself why. Surely you just need to… and then recall that the solution is a feature that appeared in a later version that the client is using.

So, I thought I'd take this opportunity to highlight some of the new features that have been introduced in the last few releases that can help alleviate some of the issues that are frequently encountered.

SNAP MID BETWEEN 2 POINTS


The first that comes to mind is the ability to snap to the middle of two points, which was introduced in 2022. This has long been available in AutoCAD but was only recently added to Revit. When drawing walls, sketching floor boundaries, or moving and copying etc., you can access the snap overrides via the right-click menu, with Snap Mid Between 2 Points being the first option on the list.

Alternatively, you can enable it with the “S2” keyboard shortcut. You can even repeat it to get a quarter distance between the points.

It should imply that fewer detail lines, dimensions, or reference planes are required to accurately position objects.

 SHEET REVISIONS

The ability to have multiple revision numbering types was introduced again in 2022. This means that numbering systems with different prefixes, such as the Provisional and Contractual revisions commonly used in ISO19650 compliant projects, can be defined. When defining the revision, the appropriate revision type can then be selected and applied to sheets as needed. The revision sequence will reflect the various types.


The ability to edit revisions on multiple sheets at the same time is a fantastic addition to Revit 2023.1. Simply select the sheets in the project browser and go to the properties palette and click "Edit Revisions on Sheet" as usual.


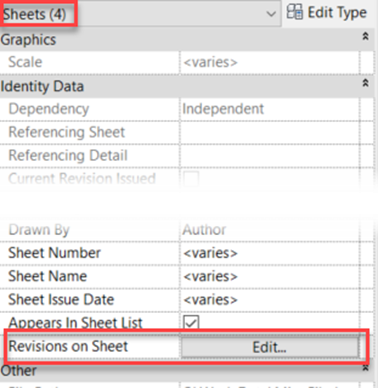
A minor change that can easily be overlooked if not highlighted, but it can save a significant amount of time spent going through individual sheets to assign a revision.


PDF EXPORT

Once the revisions have been applied and you are ready to issue them, PDF is the standard format. A built-in PDF printer has long been a request for Revit. Again, AutoCAD has had these for many years, and the difficulty of finding reliable PDF creators that aren't too expensive for everyone who uses Revit has caused loads of frustration.


The issue was eventually resolved in the 2022 release, but not as part of the print tool. Export PDF is a new tool available from the export menu rather than the print menu. However, it added some really useful functionality in terms of naming the PDFs.

The printed views or sheets can be combined as multiple pages in a single PDF. 2023 gave the ability to control the order of pages in the PDF, or as individual PDF files. As individual files, the naming can be customised using parameter values from both the Sheets and the Project Information, allowing for the automatic creation of complex naming formats used in BIM compliant projects, including the current revision.

It can also detect the page size from the title block, allowing us to batch-plot PDFs of all sizes and name them correctly in a single tool built into Revit.

If you want this functionality in 2021 or are interested in how it can be expanded in 2022 or 2023, please contact us and enquire about Symetri's Naviate toolset!

SHEET TOOLS


 Sheets can now be duplicated in Revit, and views can be duplicated as dependent or independent at the same time. This has been a long-requested tool, and it is greatly appreciated.

Views placed on sheets can also be swapped for a different view; there is no need to delete the view from the sheet and place the alternative view separately, ensuring it is aligned with the previous view.


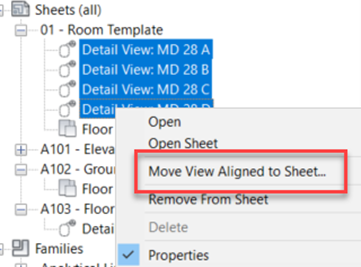
Views can be moved between sheets in 2023.1 by dragging and dropping them in the project browser, or by using the right-click menu, which allows the user to select from a searchable list of sheets.

 SCHEDULE TOOLS


The ability to split and place schedules across multiple sheets is the first feature. Instead of having to create and manage multiple schedules with filters, a single schedule can be created and split across multiple views, much like a dependant view. Work in the main schedule and changes will be reflected on all sheets as needed.


Another useful feature is the ability to search for sheets, categories, parameters, and so on when placing on views, pasting objects, or creating schedules. In this case, dividing a door schedule across three sheets that are numbered or named appropriately allows them to be easily found in the project's long list of sheets.

 The ability to filter parameter types and search for names when creating schedules saves time scrolling up and down the long list of project parameters. A similar search function in the Visibility/Graphics Overrides saves time as well.

Finally, the ability to filter schedules based on the objects displayed on the sheet is an exceptionally useful addition. Creating a sheet for individual rooms or apartments that includes a schedule of objects for that specific space, for example, meant creating a separate schedule for each room or apartment. Now, a single schedule for the entire project can be created and placed on multiple sheets. The schedule will only list the objects visible in other views on the sheet once it is placed on the sheet.

TWINMOTION

The last update I'll mention is not really a Revit feature. Twinmotion from Epic Games is now included as part of the AEC Collection in Revit 2023.1.


Twinmotion is a standalone, real-time visualisation software package, powered by the Unreal Engine, that can be downloaded and used as part of the AEC Collection licence.
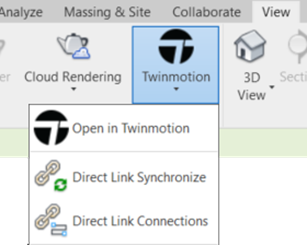


There is an Open in Twinmotion tool in Revit 2023.1 that will create a link between the Revit model and Twinmotion, which can then send updates from Revit to Twinmotion.

Additional items can be added to Twinmotion to build the scene once the model is there. To make a model come to life, add landscaping, trees, roads, people, cars, lights, furnishings, and other extras. The Revit model's materials can be changed or substituted with new ones.

Many of these objects can also be animated. Objects will be affected, causing trees and grass to sway in the wind and water to ripple, as a result of the weather. Set the time of year to winter to see snow falling in your model. People and vehicles can follow easily drawn paths with speed and quantity controls.


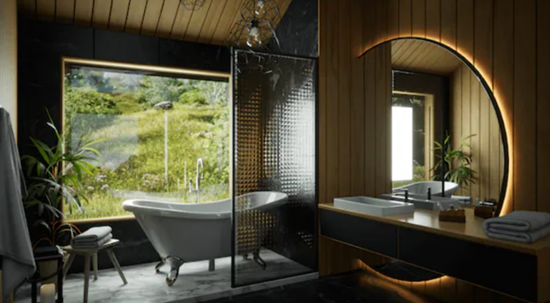
Twinmotion then enables you to generate high-quality images in photorealistic or non-realistic styles such as hidden line and white models. Videos, 360-degree panoramas and videos, and interactive VR presentations are also possible outputs.

Due to Twinmotion being a standalone tool, it can also connect models from other versions of Revit. Therefore, if you're still using Revit 2021 or 2022, you can still benefit from the Twinmotion addition to 2023.

CONCLUSION

As Revit evolves, there don't seem to be many big headline features that catch people's attention. This means that users rarely feel the need to upgrade and instead prefer to work on older versions. However, there are many new and updated features in each release, and some of them can make a huge difference to the workflow on some projects - even if they are not making headlines when they are released! If you're using an older version of Revit, look for areas that seem time consuming or repetitive and notice if there are any improvements in a newer release that could help. If you're unsure, contact Symetri and one of our experienced consultants will gladly help to see if there is a more efficient way of working in Revit, whether that involves using a newer version or not.

 I hope you found this article useful. If you need more help in Autodesk Revit, please contact SYMETRI by calling us on 0345 370 1444 or email us at info@symetri.com.


Monday, 27 March 2023

Information Management and the Challenges Faced in Construction

When discussing Information Management, it’s worth starting with what is included under the umbrella term, in the Architectural, Engineering, Construction and Owner/Operator (AECO) industry.

Information management in construction touches upon the collecting, organising, and disseminating information related to a construction project. This information can include design plans, cost estimates, and schedules. It also covers data generated during construction, such as progress reports and quality control data. During the operational phase, Information Management encompasses project approval documentation; contracts, agreements, facilities operations, as well as property management information.

Effective Information Management is critical for ensuring that all stakeholders have access to the information they need, to make informed decisions as well as reduce the risk of errors and delays on a construction project.

The term is sometimes interchangeably used alongside BIM Management, but there are significant differences between the two. BIM management is a subset of information management, but it specifically focuses on the 3D digital model of the building and the data associated with it. On the other hand, information management encompasses all the information related to a construction project, including but not limited to BIM.


So, what are the gaps we want to highlight?

The construction industry has faced several challenges in recent years. Some of the most notable include:

Labour Shortage

Due to the impacts of Brexit and an aging workforce, the construction industry needs more young people to enter the sector. BIM / Information Managers have increasingly been changing jobs, putting pressure on companies who lose their knowledge and skillset. Thus, leading to increased competition for skilled workers and higher labour costs. Therefore, buying in expertise as needed starts to become a very viable option.


Increasing Costs

The overall cost of materials and labour has been rising, resulting in more difficulties for construction companies to compete and remain profitable. Additionally, there’s an increasing demand for more sustainable, energy-efficient, smart buildings - which consequences in a higher price tag overall.

Delays and Budgets Overrun

Construction projects often need more time and budgets overrun, making costs increase and overall profitability decreased. That is due to factors such as changes in the scope of the project, lack of proper planning and other unforeseeable outcomes.

Lack of Productivity

The industry continues to heavily rely on manual labour and manual processes, and there is a lack of technology integration in many projects. Additionally, with training quite often seen as a “nice to have”, finding more efficient and new ways of working will be missed, contributing to further productivity issues.

Complex regulatory and legal environment

The construction industry is heavily regulated. Compliance with various codes, laws and standards can be both complex and time-consuming. Despite the benefits, this can lead to added delays and costs.

Climate change and Natural Disaster

Climate change is also a challenge faced, causing increased natural disasters such as floods, droughts, and hurricanes, damaging construction sites, and delaying project progress.

The above list is not exhaustive but shows the main issues the industry has been encountering lately. Majority of these can be dealt with the use of effective Information Management. As the process helps with planning, relocating and effectively using all the resources involved in the venture.

How can Symetri help you?

Symetri offers BIM consulting services, software solutions and training courses which help our clients use Information Management effectively. Working with us can be the first step to addressing the lack of productivity and bridging the gap in a labour shortage.

Our multinational BIM consulting team are experienced in all stages of projects on a worldwide scale, and can support you with:

-       BIM Standards, methods and procedures

-       BIM Management documentation

-       BIM documentation peer review

-       Digital implementation and BIM strategy development

-       Or we can even be part of your team for one or several projects that you need support on.

If you would like to discuss your requirements or any of our BIM Consulting services, please contact us to see how we can help by calling us on 0345 370 1444 or emailing info@symetri.co.uk.


Monday, 6 March 2023

INFODRAINAGE STANDARD VS ULTIMATE

A drainage design software platform called InfoDrainage makes it possible to create Sustainable Drainage Systems (SuDS), Green Infrastructure, and traditional drainage systems. Both storm and foul networks are supported, permitting 1D and 2D simulations of multiple storms simultaneously.

InfoDrainage comes in two distinct tiers: Standard and Ultimate. InfoDrainage Ultimate offers all the features of the Standard edition in addition to 2D analysis and integration with Civil 3D. These features are discussed in this blog, along with some of the restrictions of the Standard version and, if available, any alternative workflows.

2D ANALYSIS

INFODRAINAGE ULTIMATE

A 2D analysis that shows the depth and speed of the exceedance flows in a plan view can be used to assess the flood danger to property or people during an extreme event.


INFODRAINAGE STANDARD

InfoDrainage Ultimate is the only product that offers this functionality.

CIVIL 3D INTEGRATION

INFODRAINAGE ULTIMATE

Using a special ribbon, which is available for Civil 3D 2020 and later versions; pipe networks, surfaces, and catchments from Civil 3D can be easily exported to InfoDrainage. Parts mapping can be used to choose the InfoDrainage connections and junctions that will substitute the Civil 3D pipes and structures after the network has been exported from Civil 3D as a storm or foul network. If there are numerous iterations between InfoDrainage and Civil 3D, this mapping will be remembered, and templates of this correlation can also be saved for use in other drawings.

In Civil 3D, the import procedure can build a new pipe network or update an existing one, making it easier to synchronise any changes made to the design. If the network in InfoDrainage includes any elements (such as ponds, swales, cellular storage, or open channels) without an equivalent structure or pipe in Civil 3D, those elements will be included in Civil 3D using polylines, feature lines, corridors, and surfaces. Multiple barrel connections are also supported and will appear in Civil 3D as multiple pipes.

INFODRAINAGE STANDARD

InfoDrainage Standard does not include a dedicated ribbon in Civil 3D. Although some InfoDrainage objects can be transferred using an intermediate file format, like AutoCAD, LandXML, or a shape file, it is frequently necessary to manually update and even model those objects in Civil 3D. Additionally, the Standard edition of Civil 3D only allows for manual updating of Civil 3D items (such as pipe diameters or slopes).

Using the Standard version necessitates exporting each object from Civil 3D to an intermediary file format and then importing that file from InfoDrainage, whereas the Ultimate version will export all the objects (pipe networks, surfaces, and catchments) and their properties simultaneously.


For pipe networks and surfaces, it is possible to use the LandXML format. A small inconvenience is that the Pipe and Structure names differ slightly between Civil 3D and InfoDrainage (e.g., "MH1" in Civil 3D vs. "MH1 (SWS)" in InfoDrainage, with "SWS" standing for the network name. Exporting to a CAD format is an option if LandXML does not produce the desired outcomes for the pipe network. This will result in the pipe network being exported to AutoCAD as a 2D polyline, requiring the creation of the pipe network in Civil 3D and the manual entry of the appropriate levels, pipe, and structure sizes.

InfoDrainage Standard does not allow straight import of civil 3D catchments. The Civil 3D model must be exported to an AutoCAD format prior to importing the catchments from that file. Since the catchments will be generated in InfoDrainage from polylines, the catchment names and runoff coefficients must be manually edited to match the values of the Civil 3D catchments.

It is possible to create new objects or change existing ones when importing an InfoDrainage file into a Civil 3D drawing that already exists. The diameters, slopes, and other dimensions of current pipes and structures can all be updated using this. A Civil 3D network can be modified to match the InfoDrainage file by adding new branches or removing old ones. This is not feasible with the Standard version; you would have to manually compare the two networks to look for those changes.


Similar to how you would export them, pipe networks and surfaces can be imported into Civil 3D using the LandXML file. The LandXML file does not contain stormwater controls (such as ponds, swales, cellular storage, etc.) or non-pipe connections (such as channels), so they must be imported separately. They can be imported as 2D polylines from Civil 3D using a shape file. The objects would then need to be modelled using Civil 3D tools. They are brought immediately as 3D objects using feature lines and surfaces by the InfoDrainage Ultimate ribbon.

Using a shape file, catchments can be imported into Civil 3D as 2D polylines. You then need to create each catchment from a polyline, rename them, assign a structure, and update the runoff coefficient using the values from InfoDrainage.

This video provides a quick comparison of these tasks performed in InfoDrainage Standard and Ultimate, or just in InfoDrainage Ultimate if no other workflows are available for the Standard version.


Do you need more help in Civil 3D? Take a look at our wide range of Civil 3D courses here. Alternatively, please do not hesitate to contact SYMETRI  on 0345 370 1444 or email us at info@symetri.com for more information. 


Wednesday, 22 February 2023

Why Choose Symetri As Your Autodesk Training Provider?

Training is an investment in yourself, your career, and your future. It is a crucial part of personal and professional development that can help you achieve your goals. Training can offer many benefits, whether you're looking to learn new skills or stay up to date with the latest trends and technologies.

Symetri is an Autodesk Learning Partner. There are several reasons why you should consider using an Autodesk Learning Provider for your Autodesk software and training needs:


The Benefits Of An Autodesk Learning Partner

Autodesk Learning Providers are certified experts in their field, with extensive experience in using Autodesk Software. All our trainers are classified as Autodesk Certified Instructors, and they have the skills and knowledge to teach others how to use Autodesk software. When you are trained by us, you will receive high-quality training based on the most current industry standards and best practices. Additionally, we have access to the latest training resources and tools provided by Autodesk, which enables us to provide up-to-date training to students.


Scheduled, Private And Customised Training Options

Each organisation has different training requirements, so Symetri offers flexible training options, including in-person, virtual, and on-demand training, to accommodate a busy schedule and learning style. This can be in the form of scheduled courses that take place regularly or with company-specific training; you can pick dates that fit you and your organisation.

You can also complement instructor-led training by investing in Pinnacle Series, the e-Learning platform we support.

We can customise training programs to meet your specific needs and goals. The content delivered on the course will be designed by your trainer, who will be an expert in your chosen software and can even use your own models and projects on the course.  If you are encountering a specific problem on your project, this could be the ideal way to learn by working on a real-life example, making sure that your goals are met. 

A Range Of Training Facilities Across The UK

Symetri has several training centres in the UK. Classrooms are equipped with PCs and projection facilities, ensuring that the environment you learn in is fit for purpose. All PCs have the latest version of the software you need for your course. For more information about where our Training Centres are based, please click here.

For customer-specific training, you can learn on the same version that you are using in your organisation. 

This can be delivered at your site if that is preferable for you. There is also the option of using our Mobile Workstations or gaining access to a virtual machine throughout the course. Virtual Machines embrace the power of cloud computing, delivering the software onto any machine with internet access.  So, if you do not have enough licences for you to use your own machines when training, this solution is available to you.  It could also allow delegates to use machines that are not traditionally powerful enough to run high-end CAD software.

Virtual Instructor Led Training (VILT) 

Attending virtual training is more convenient. VILT has a different element to in-person training with real-time chat, polls, and pop quizzes, which brings another way of interacting.  Some people will be more comfortable in their own space and are open to asking questions. 

Virtual Training is scalable, allowing colleagues from different offices around the country and other regions to attend the same course.

E-MANUALS 

Sustainability is an essential element in our lives and businesses. Therefore, Symetri has decided that all training manuals will be delivered in an electronic format offering several benefits.

  • Easy storage - E-manuals can be easily stored and accessed on electronic devices, making it possible to carry an extensive library wherever you go.
  • Enhanced readability - Text size, font style, and background colour can be adjusted to enhance readability
  • Search function - With a built-in search functionality, it is easy to find specific information quickly.
  • Environmentally friendly - E-Manuals are a more environmentally friendly option as they do not require any paper or need to be shipped around the world, reducing both Symetri’s and our customer’s carbon footprint.

Explore our full range of trainingcourses. To book an appointment and discuss your training requirements with us, please get in touch. 

Contact us:

info@symetri.co.uk

0345 370 1444

Thursday, 22 December 2022

Autodesk Fusion 360 for Design & Manufacturing – Exploring the Workspaces!

In my upcoming blogs, I will dive into why Autodesk Fusion 360 is such a disruptive technology on the market and why industry and educational institutions are becoming more interested in what Fusion 360 has to offer.

In this blog, I will explain what Fusion 360 is and introduce the Simulation, Manufacture, Drawing and Electronics Workspace.

So, what is Fusion 360?

Fusion 360 is the first collaborative, cloud-enabled CAD, CAM, CAE, and 3D PCB design platform that allows designers and engineers across the industry to connect, collaborate and ultimately bring products to market faster than before.

The Simulation Workspace

The Fusion 360 Simulation Workspace allows Engineers to perform simulation studies of different FEA concepts on the design models. The following image is an overview of the types of study that can currently be generated:

These tools available in the preliminary design stage allow engineers to perform testing on the products during the design phase to help reduce errors and improve the product’s safety before the manufacturing process starts.

Fusion 360 users also have an advantage where you can import any native CAD file from any CAD package on the market and perform FEA tasks when required. Models can also be simplified in the Fusion Design or Simulation Environments that allow output to other third-party FEA tools that may be used in the design or quality departments, for example, ANYSYS, CFD etc.

The Manufacture Workspace

Fusion 360’s Manufacture Workspace offers the CAM Engineer a comprehensive set of manufacturing setup options for Milling, Turning or Mill/Turn, Cutting, Additive, Inspection and Fabrication type workflows.

The types of toolpath strategies available include 2.5-Axis Machining, 3-Axis machining, 3+2 (5-Axis Positional) Machining and 5-Axis Simultaneous Machining techniques. Recent updates are incorporating high-end machining strategies such as Steep and Shallow finishing found in Autodesk Flagship CAM package PowerMill, including multi-axis capabilities and collision avoidance, strengthening the machining capabilities that Fusion 360 has to offer.


As the associative behaviour of Fusion 360, where changes are made in the Design Environment, is automatically updated and reflected in the Manufacturing environment meaning that CAM related rework to applied toolpath strategies is kept to a minimum and captured with the design change.

Autodesk Fusion 360 offers an excellent machining simulation environment allowing CAM Engineers to simulate their toolpaths. They can check for collisions and gouges. Adjustments can be applied to the toolpath strategy to ensure a high level of safety before generating the NC code required to operate their expensive CNC machinery.


Autodesk gives users access to a free online library of generic post processors, machine simulation files and tooling libraries where all the big players in the CNC world are accommodated for. They are constantly updated with the new and required functionality, including new machines and post-processors being added regularly

If you are unable to locate the desired post processor and or machine simulation file, you have two options:

Option 1

Autodesk released instructions on manually creating and manipulating post processors, which can be found on the Post Library Website.

Option 2

Manufacturers can approach highly training Autodesk Partners to take on post-processor development projects to get you up and running with the software by producing working post-processor and machine simulation files to suit your needs.

If you are looking at adopting Fusion 360 for manufacturing, exploring the Post Processor Library is the perfect place to start. Many post processors are available for free. If you find a post relating to your CNC hardware, see if you can replicate the required toolpath strategies created with your current CAM solution?

Symetri offers excellent services to help you explore Fusion’s functionality and see if it is right for you. We can take your models, apply toolpath strategies, and generate test code to see if further alignment is required for a working post-processor. We also offer comprehensive best-in-class training around all the CNC machining capabilities mentioned above.


Friday, 2 December 2022

Stepnell’s BIM approach for University of Worcester - The digital journey from construction through to facilities management

This blog takes a look at the use of various technologies on a refurbishment and extension project, resulting in gaining maximum insight and value from a Revit 3D model, streamlining workflows, formatting data for direct input from the design models into a Computer Aided Facilities Management (CAFM) system, through to the use of point cloud technology to assist subcontractors, and monitor site progress every step of the way.

 “This has been a completely BIM-driven project and, as all asset data now moves seamlessly into our CAFM system Archibus, it will carry on being so for long into the future. It was a steep curve learning process for all parties as we set out to integrate numerous technologies, while also working up against the many complexities of combining a refurbishment with a new build.

I firmly believe that embracing others’ knowledge for the betterment of the project is key to a successful outcome. Symetri, were the connecting strand in all of this; they knew what solutions and specialist digital skills to bring to bear, when. It’s something they do every day. Now Stepnell can too”


Charlotte Brogan, Technical Manager at Stepnell

Meet Stepnell

Stepnell is a complete construction partner, with end-to-end project lifecycle expertise. The company's main objective is to make sure that its customers realise their visions. Clients can feel confident that every aspect of their project will be executed effectively, to the highest standards, and in a collaborative manner thanks to Stepnell's breadth of expertise and holistic approach.

Stepnell is a financially resilient company with over £58 million in net assets and a history spanning over 150 years in the industry. Stepnell's management team is knowledgeable, experienced and commercially responsible.

Stepnell work with a wide range of clients in the public and private sectors. They combine the focus and accessibility of a regional contractor, with a depth of technical competency, professional capability, and national reach, usually associated with far larger construction companies.


Elizabeth Garrett Anderson building - A showcase project laying the ground rules for the future

Stepnell was successful in its tender for a project from the University of Worcester which included transforming the former Worcester News building, a sizeable two and three storey building, constructed in1965, into a first-class facility for the training of health professionals.

The building has been named by the University as the Elizabeth Garrett Anderson building, in honour of the first woman in Britain to qualify as a physician and surgeon.

The project was partly refurbishment and partly a new build; stripping back to shell and core and then building an extension. Planning was essential for the process of capturing the existing structure and integrating it with the new construction, especially in the context of generating point cloud data.

The University team also requested the usage of a reliable Computer Aided Facilities Management (CAFM) system, which calls for data to be reliably populated from the building's maintainable assets. When it came to synchronising the data between the Revit model and the CAFM system against strict parameters, this latter requirement posed a particularly difficult task. There were additional difficulties, which gave Stepnell the chance to create an approach to projects of such complexity, that would later serve as a model for other projects.

To assure adherence to Building Information Modelling (BIM) norms while adapting to the specific requirements the University voiced for its CAFM system, a complete multidisciplinary team of professional technology providers came together.

 STAGE 1: Preparing to succeed

·         Establishing the BIM level 2 framework

BIM was clearly something that the University of Worcester wanted to utilise on the project. They were determined to employ Revit 3D collaborative models and to make sure that all important data to facilities management after handover could be transferred from the Revit model to the CAFM system, Archibus. This system hadn't yet been put in place.

Stepnell included Symetri as its designated BIM partner for information management during the tender stage, and this partnership swiftly grew. The University's Service Development Manager for Estates and Facilities contacted Symetri for advice on the necessary detail and documentation for the BIM Level 2 project as well as for setting up the facilities management system before they could create their specific clarified requirements for Stepnell. These two foundational strands of project preparation got underway in parallel.

The University team was coached by Symetri through all of the crucial BIM requirements, protocols, and associated project planning, and created key documents like the BIM Execution Plan (BEP). Additionally, they showed how workflows would be integrated between the construction stage (and earlier) to facilities management (and beyond).

·         Simplifying the data focus

The University team appointed Service Works Global (‘SWG’—part of the same group as Symetri) under a separate service to the BIM support services. SWG experts in computer aided facilities management, who guided the setup of Archibus to meet the precise requirements of the University around pertinent data and asset information.

To ensure that the parameters were shared, it was necessary to pay attention to the nature of the data and how it was presented in order to match the file data coding with Archibus. This included information like the building code, warranty information, classification codes, and serial numbers.


Usually, Construction Operations Building Information Exchange (COBie) data is used for these purposes. However, the University had a specific requirement on the precise fields of information they needed for the maintenance of their CAFM system, thus it was chosen to structure the data in a bespoke manner. The data that is available in the 3D model is also difficult for those who are not necessarily 3D proficient. The fastest path to comprehension is simplicity. For example, asset manuals are now conveniently accessible by having the URL embedded in both the Revit file and Archibus.

Together, Symetri and SWG formatted the data fields and guided population of the information from the design teams and suppliers directly into the database. This collaboration's specific objective was to create a data flow between Archibus and the project models, so that modifications could be done in the model authoring software and then simply exported, sent to the university, and imported into the CAFM system (Archibus). There were regular data-drop dates that necessitated a general ‘health-check’ on the models from Symetri, in order to make sure the information was accurate before pushing to the university. Symetri used Solibri to ensure the data were reliable, correctly assigned, and checked for information quality within the model.

We’re ready

“At this early stage we knew that every aspect of both the BIM parameters for the project and the smart use of data both within and beyond it had been addressed” says Charlotte Brogan, Technical Manager at Stepnell. “The University was up to speed on how to adhere to BIM protocols and were reassured that the team that we had around us in specialist support roles, were giving everybody a lot of confidence”.

STAGE 2: On-site—making the connections between physical and digital

With the CAFM system in place and the BIM direction of travel defined, documents prepared, and all involved parties brought up to speed, it was time to address how what happened on site, would not sit alone as a physical exercise, while information capture and data foundations for facilities management sat in a different digital world.

·        Gaining visibility of the frame

It took a laser scan to display the frame following the strip-out. The intention then was to combine the point cloud data with the 3D models. From the perspective of MEP and structural contractors, this stage was crucial.  For instance, in order to help them build the roof cladding (a gold copper shingle) offsite, the roof cladding suppliers needed to see how the roof looked. For the purpose of detecting clashes, the point cloud was also crucial.

At this point, the next specialist company joined the team. Stepnell was referred by Symetri to 1st Horizons, who specialise in 3D laser scanning among other things. An invaluable lesson was learned at this stage around the specifics of point cloud.

A simple scan will examine every element in its path. Even when these are subsequently meshed, they do not convert into the ‘solid’ elements that Revit requires. The way around this is to commission a ‘Scan To BIM’ that creates a 3D geometric shape compatible with Revit.


·         Seeing the site progress - 360° image capture
Going onsite and taking a look at the situation has typically been done to ensure that the model accurately depicts reality. Taking pictures with a camera (or a smartphone camera), uploading them, attaching them, and sending them can take a lot of time.

Oculo builds a 3D walk environment using a hard-hat mounted camera by taking countless continuous photos until the final product closely resembles video footage and can be completely manipulated on-screen (zoom in and out, rotate etc). A key function of Oculo is the ability to import the project clash detected federated model directly into Oculo, which can be used to compare the scans of the physical as-constructed state on site against the design intent models.


“Oculo has really sped up so many tasks that were previously so painstakingly slow”, says Charlotte. “As-built checks are now easy and also deeply detailed, allowing us to compare what is happening on the site directly to the model”.

Charlotte also states that changes can now be made to the design and not onsite, the far more costly alternative.


The outcomes

The Elizabeth Garrett Anderson project got underway on 6th June 2021 and is on track for completion in December 2022. Beyond just finishing the project, it has been a valuable exercise in educating all parties in best practice in digital and physical, and connecting the two together:

  • University of Worcester intends to use its new BIM standards (such as the EIR and the AIR), to define all projects going forward.
  • University of Worcester now has an up and running CAFM system.
  • Data is now formatted for feeding into Archibus from the model.
  • Clarity, collaboration, and contentment—a winning combination.

Would you like to discuss your BIM projects or Construction workflows?

Please get in touch with SYMETRI by emailing us at info@symetri.co.uk or call us on 0345 370 1444.


What’s New in AutoCAD Electrical 2025

This blog will examine what’s new in AutoCAD Electrical 2025. Automatic Reports Enhancement In AutoCAD Electrical 2025, you can now cre...