Saturday, 29 October 2022

Join our new community to accelerate your use of Revit and Civil 3D

Architects and Engineers have a strong dependency on the technology that fundamentally underpins the design process. However, it has been recognised within the industry that there are limitations within the most commonly used software suites such as Autodesk. This encouraged Symetri to look at how we could help and started working on a Revit and Civil 3D add-on called Naviate.

Naviate is a product portfolio of add-on software for Revit and Civil 3D from Autodesk. The add-ons include features that help productivity, documentation, collaboration, and managing projects. Working with Naviate saves you valuable time, enabling more time to create elegant and purposeful buildings and infrastructure.

Since Naviate was launched, we have seen users grow. This growth of users hasn't been accessible to anyone outside each company joining us, though. We've been thinking about how we can put everyone in one place for easy access and learning. Social media was a start, but it was time for the next step; a Naviate Community.


The Community is live

The Naviate Community is live! Spread the word to everyone who wants to discuss Naviate, Revit and Civil 3D-related topics, and we invite you to join us.

We want you to be part of the Naviate Community. As a user, your experience and feedback are valuable. You can meet up with other users and the Naviate team. Your input on our products, ideas, tips, and questions will help us make better decisions for improvements and development of Naviate.

Join Naviate Community


Saturday, 8 October 2022

What Is a Suitable CAD Workstation That an Architect Should Consider?

There is no doubt that there are some amazing computer-aided design (CAD) software solutions and toolkits available in the Architecture, Engineering, and Construction industries today, including AutoCAD, Revit, and Symetri’s own solutions like Naviate.

Architects are now more than ever, able to present some impressively detailed models to succeed in winning businesses, advance their business, and set an excellent example.

When working with new prospects, there is often a key "proof of concept" stage that necessitates being able to effectively demonstrate the final results before any agreement is made with a new client, much alone before any construction is started.

This is especially true within the building design stage in architecture, as well as many similarly challenged design firms. A detailed model is a ‘must have’ for clients on almost every project of this nature, whether it be for obtaining planning permissions, meeting sustainability requirements, or simply showing the homeowner what will be a lovely and well-thought-out design on the project for which they are investing so heavily.

Therefore, it makes sense that the industry depends so heavily on companies like Symetri and Autodesk to create the software tools required to accomplish all of this and more.

But with all this powerful CAD software at our disposal, can we really use it on just any computer?

It's crucial to make sure your hardware matches the software requirements if you want to offer the results you really desire. At Symetri, we work hard to give our customers the greatest and most up-to-date hardware available, customised to all of the CAD programmes we support, as well as many others that make use of this technology. When showcasing 3D models in Revit, creating bespoke housing models in AutoCAD, or even creating client logos in other applications like Adobe Creative Suite, we want you to be at your very best.

In light of this, I've suggested one of our top sellers that is perfect for Architects and designers alike, in creating the greatest possible 3D models that render intricate textures and visuals to impress clients.

Are you an Architect or a designer seeking for a strong, portable, sturdy CAD workstation, with a lovely and high-quality finish that you can use to show clients your designs?

If this describes you, the HP ZBook Studio G9 16" Mobile Workstation might be the perfect fit for you.

HP ZBook Studio G9 16″ Mobile Workstation


Top specs:

  • Intel Core i9 (12th Gen) 12900H / 2.5 GHz (5 GHz)
  • 32 GB DDR4
  • 1 TB SSD – NVMe
  • NVIDIA RTX A3000 12 GB GDDR6 SDRAM
  • 16" IPS 3840 x 2400 (WQUXGA) @ 120 Hz
  • 6-cell - up to 9.5 hours

Why do we recommend this?

  • Blindingly fast CPU performance, with options going right through the intel range to the latest i9 models that offer multiple cores for CPU-Rendering.
  • Up to 32GB RAM which allows for a generous amount of multi-tasking without any of the performance lag.
  • Multiple GPU options available to suite a budget or for best performance such as the latest nVidia RTX A3000 with more than enough GDDR memory to support an array of applications, as well as faster clock speeds for superior GPU-Rendering and precisely detailed textures.
  • A beautiful display to complement the above with a configurable options for full HD WLED / OLED display options across a 15.6” or 16” display.
  • 512GB or 1TB NVMe SSD high speed storage as standard, with additional storage capacities also available.
  • Impressive battery with on average up to 9.5hrs, with a fast-charging cable that can replenish the battery to 50% in as little as 30 minutes.
  • HP Workstations use hardware that benefits from ISV approval (Independent Software Vendor) by Autodesk, giving you the peace of mind that this has been tested and approved at the highest level.
  • All our CAD workstations are supplied with 3 years of on-site warranty, meaning that you can rest assured that unlikely issues should they occur will be resolved quickly by an engineer visit.

In addition to this, Symetri has produced a CAD workstation recommendation guide which offers more options based on your requirements: https://www.symetri.co.uk/campaigns/cad-workstation-recommendations-guide.

If you would like a personalised bespoke recommendation tailored to you, please contact SYMETRI by emailing us on info@symetri.co.uk or calling us on 0345 370 1444.

Friday, 7 October 2022

Set and Control Watermarking in Vault Based on the Current State of the File

Watermarking can signify whether the document is a preliminary version, not ready for production or just a document for pre-reviewing a design. A watermark will most likely eliminate the risk that production is done from non-released documents. 

Using native Vault functionality, it is possible to add watermarking to DWF files, but only when printing from Vault. However, many of our clients said that they required the same feature based on document level control. With the latest 2022.2 and 2023 releases of the Autodesk Vault Add In, Sovelia Vault, we now have built-in watermarking for 2D PDFs, dwfs and dwfx files. 


It has become evident that there were two main scenarios in that customers would use watermarking:

  • When generating a PDF to a network / other business system
  • When viewing data in the vault via mobile and thin clients.

In the first scenario, a PDF may be generated out of vault for use for the shop floor, customer or supplier checks.  These PDFs are not thoroughly checked, approved and released at this point and should not be used for manufacturing. Customers have requested watermarking to make clear the state of this information. 

In the second scenario, users may be viewing and downloading data directly from these clients; our customers wanted to ensure that downloaded PDFs were not released and were watermarked to give an element of control. In both cases, watermarking was introduced to allow users greater visibility of the current data state when using these files outside of the Vault system.

Set and control watermarking based on the current state of the file

Sovelia Vault allows administrators to set watermarking based on the current state of the file with control over the text, orientation, location, and colour of the watermark.  Text can be set based on built-up expressions of static text and document properties, allowing administrators to control displayed information.  In addition, Sovelia Vault allows control to enable watermarking on “all states”, a “named state,” or “all states except” conditions, allowing all states to generate watermarking except for a released state as required by many companies.


This new feature was critical to successfully expanding the use of Vault to staff outside of the design team within companies that tested this functionality—driving clearer information to those users and the wider business.

To find out more about the Autodesk Vault Add In, Sovelia Vault, visitor our website: https://www.symetri.co.uk/products/sovelia-vault

Or what our video below:

 Video: How to Watermark your designs with the help of the Autodesk Vault Add In, Sovelia Vault?


Monday, 19 September 2022

How Can We Help You Increase Your Design Productivity

When I considered the recent conversations I had with some of our clients, I was surprised by how many of them are actively looking for suggestions on how to increase productivity. They can generate the models and drawings needed for their projects, and they can do so to a high standard, but they constantly have the same nagging feeling that there must be a better, quicker, or easier approach.

Scheduled or bespoke training 

So, what do you do when your design team has received training on the software and is clearly able to use it to generate the work, but it doesn't seem to be working as efficiently as it should be and some tasks are taking too long?

Symetri offers training on Autodesk software, from a basic Essentials course to more advanced topics. However, sometimes more training isn’t the solution. It gets harder to select the correct training course as you go up to more advanced topics At an advanced level, the topics themselves seem to increase exponentially – and no training course can accommodate every topic – especially not in the amount of detail required.

My first piece of advice is to simply pick up the ‘phone and give us a call on 0345 370 1444. You can ask to speak with one of our consultants if you need to get in touch with a professional for the software you are using, whether it be AutoCAD, Civil 3D, Revit or something else. The majority of consultants share a similar fundamental character; they enjoy solving problems and find enormous delight in doing so. It benefits both parties when we talk to customers who are having issues because we gain insight and obtain knowledge that we can apply to assist other customers.

If a solution is delayed, we'll present you with a few alternatives. A Workshop may be the best solution if the problem is a technical workflow issue. Unlike training, where the Trainer is providing specific instruction, a workshop is a meeting where all participants will engage in intensive discussion and activity on a particular subject or project. The Consultant will lead the workshop, share their expertise, and collaborate with your teams to identify the ideal solution that matches your particular set of circumstances. These sessions work best with small teams whose members are already proficient with the technology in question. They can cover more than one topic or technology and can be a cost-effective way to improve productivity.

Following an initial conversation with you, our consultants will frequently be able to determine whether implementing a specific workflow or integrating technology solutions can resolve your problems. All is not lost if they don't believe that any in-product or off-the-shelf solutions are available. Most design applications offer some method of customisation. These could range from simple macros to more complex development using a programming interface, and for some issues, such as data transfer across various systems, this might be the only viable solution.

DIY or not?

If customisation is the best solution for your problem, you may either ask us to handle it for you or train your employees to carry out the customisation. The benefit of the DIY method is that your employees will learn how to customise the application, and they can use that knowledge to address other problems down the road; the drawback to this is that it diverts the staff-member from productive work and may not be the best use of resources. If you decide to go with this option, think about letting one of your more junior staff members to take this on. They are often keen to learn and pick things up quickly, and the cost to the business is significantly lower than if a senior designer were to take responsibility.

Many organisations who wish to continuously increase productivity have found success offering training on tools such as Dynamo for Revit or Civil 3D. Such classes can frequently be tailored to provide guidance toward resolving your specific issue.

A Step Up with automation tools

While macros or tools such as Dynamo can offer solutions to many issues, they also have certain drawbacks. One of the problems is that they need maintenance over time, especially with changes in software versions and they frequently don’t get “finished” because there’s always a few bugs and they just don’t ever get fully tested.

While Symetri can also provide more robust bespoke applications for you, written in code and integrated into the application, we would rather direct you to our own technology suites. For instance, our plugin programmes Naviate for Revit and Civil 3D, provide a multitude of time-saving productivity tools. These are continually being updated and may already provide the answers you need. However, one of Naviate’s best features is the community of users who drive the development of the technologies. Since most of the tools in Naviate are based on user requests, if the solution you need is not currently in our toolset, but adding it could also help other users, then we will consider doing just that - and you won’t pay anything extra.

Can’t see the wood for the trees - exploring your processes

Sometimes, the root of your issues won’t be the technology, or how you are using it. It’s possible that productivity is lost due to poor team communication, the structure of the teams, or a disconnect between management and staff. Sometimes the problem may be a lack of consistency in your project management methods.

When everyone is busy on project work, it’s difficult to take a step back and focus on why things aren’t working – sometimes you just can’t see the wood for the trees.

Our consultants have first-hand knowledge of the many diverse organisational structures, both effective and ineffective. We can offer suggestions on how to re-structure your teams to get the most productivity out of them and enhance teamwork. We can also help drive consistency in delivery by providing guidance documentation and training that will get everyone working the same way, improving quality of delivery and de-risking your projects.

Knowledge Transfer

Regardless of the problems you encounter or the method you use to resolve them, you must make sure that the information you have gained will not be lost in the future. No business wants to spend in upskilling their employees, just to have them leave for new opportunities and take their knowledge with them. This situation can be somewhat mitigated by having a plan in place to enable information sharing within the company.

Below are some simple tips to get the most from your investment in knowledge:

·      Toolbox talks

Staff members might be encouraged to share any expertise they have gained during these knowledge-sharing events. They should be scheduled withing regular business hours – this sends a message to staff that it is important to the business and is a part of the business culture.

Mentoring

When new staff join, assign them a mentor. Your expectations for the process should be explained to the Mentor and Mentee. The Mentor should be willing to talk to the Mentee about the culture of the organisation, how work is expected to be done there, and of course how they may improve. For the Mentor to have time to perform these tasks, you should create the appropriate environment.

Documentation

When improvements are made; they should be documented. Staff will inevitably come and go, but if important processes are documented, then others can look up the solutions to problems and issues that were solved in the past. Important processes involving quality of delivery or project risks should be formally captured in business process documentation. For other solutions, perhaps relating to specific technology, then an internal Wiki site might be a good way to go. Again, you need to allow the time for staff to document the important things.

Lessons Learned

Every project should conclude with a Lessons Learned process. For small projects, this might be a quick ten-minute meeting. For large projects, it might take several hours. It offers a chance to talk about how the team performed on the project. Identify the areas where things went wrong, and work to make adjustments. Any disaster that occurred should be recorded for future projects to consider. Any new methods or processes that were tested and proved successful, should also be documented and re-used on future projects. Last by not least, make sure that everything is recorded, and that procedures are in place to ensure the information captured is used on future projects.

If you would like to discuss training, consultancy services or Symetri’s own technology, please do not hesitate to get in touch with us on info@symetri.co.uk or call us on 0345 370 1444.


Friday, 26 August 2022

The Best New Feature Of Autodesk Revit 2023 (Maybe!)

The 2023 release of Autodesk Revit have been out for a few months now and in this blog, we will go through the new features and work out which ones are the most useful to us, including:

  • Being able to taper walls
  • The improvements to linking CAD models
  • The improvements for rebar
  • The ability to swap views on sheets
  • The ability to add parameters, tag and schedule groups and links

These are just a few of the many new features to the 2023 release of Autodesk Revit.

A feature that can significantly affect workflow and save time is in the shape of a checkbox that, when selected, enables the "Filter by Sheet" function for schedules.

Building Information Modelling has completely revolutionised the construction industry thanks to its capacity to incorporate data via parameters into objects in the model, as well as its own object-based modelling.

When switching from traditional CAD processes, the ability to establish a schedule for every object in the model and have any parameters—built-in or custom defined—listed in the schedule has been a truly game-changing feature.

Comparing the time it takes to generate a schedule in a Revit model to the hours it used to take to create schedules based on 2D CAD drawings, it's almost inconceivable nowadays.

However, we still need to take the time to enter accurate data into the objects, and it's likely that someone will still need to verify that all the data is accurate. Automation can verify that certain parameters are present and filled out, but it cannot verify that the information is accurate. That needs to be done by someone with relevant experience and project understanding.


Returning to schedules in Revit, it is true that they may be made quickly, even on large projects with a significant number of objects to schedule. It's simple to imagine the list extending into thousands of objects when considering the number of doors and windows that could make up even a project of average size, as well as the amount of furniture, equipment, lighting, smoke detectors, etc. that are used in most projects.

That entails managing a very lengthy timetable that, if left as one schedule, would require splitting across multiple sheets to be readable. That has also been simplified thanks to the Split and Place feature in the 2022 release.


However, it’s common to want a schedule for a specific set of objects. For instance, perhaps only a specific zone or floor level of the project. It’s possible that a view on a sheet depicts a particular location, such as a plant room, classroom or individual dwelling, and a schedule showing details about the objects in that area is required for the sheet too.

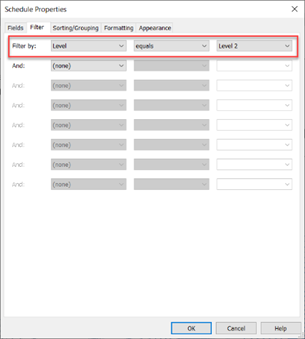
Up until 2023 the only way to do that would be to create a schedule specific to that sheet and use a common parameter value on the objects to filter the schedule to only list the required objects. This often meant creating a parameter for the sole purpose of filtering the schedule.

It is likely that this would need to be done for each apartment or classroom, therefore the schedule would need to be copied and the filter value updated accordingly.


Filter by levels

This may not be too difficult to do, for instance, if we wanted to schedule doors by level and we have three or four levels, then a door schedule per level is not too difficult or time consuming to set up and manage. However, if we had 20 or 30 levels then that's quite a few door schedules that need setting up and managing.

A different schedule would need to be created for each individual area if we were to create a type of room or space data sheet that included a plan, elevations, and a schedule detailing the equipment in that space. It's simple to picture it on a healthcare or educational project because there may be hundreds or even thousands of places.

When we have hundreds of schedules to make in this situation, the idea that we can develop a schedule in a short amount of time isn't particularly consoling. If it takes 2 minutes to duplicate, rename and edit the filter value of a schedule, it will take a whole day’s worth of time to create 200 schedules. If the schedule needs to be changed, such as by adding a new column or changing the way it shows, then this must be done for every single schedule, which will probably take more time than creating them in the first place.

One of the new features in Autodesk Revit 2023 includes the shape of a checkbox that allows a schedule to be filtered by the visible objects on a sheet.

Filter by sheet

This is a completely new concept for filtering schedules in Revit. Previously, a filter had to be based on the object’s parameter values, hence creating custom parameters to use for filtering is common practice. Currently, in Autodesk Revit 2023, a schedule will dynamically filter itself to show just the objects that are visible on the sheet upon which the schedule is placed.

The way the schedule appears on that page will change if the crop region, scope box, or even views' objects are edited or hidden. Multiple sheets can contain a schedule, and each time it does so, a dynamic filter will be applied to match the items on the sheet.

Now, even if there are several hundred rooms, only one room schedule is required, it just needs to be placed on each sheet. It could be placed on one sheet to set its position and adjust column widths, etc. Then it can be copied to the clipboard from that sheet and, using the “Paste Aligned to Selected Views” option, pasted into the exact same location on multiple sheets and obviously filtered to the objects on each individual sheet.


Schedule dynamically filtering to match the view

If the schedule needs to be changed, for instance, to add an extra column or modify the formatting, we only need to edit the one schedule, and all the sheets will be updated.

The Filter by Sheet function in 2023 could appear to be relatively unimportant at first, but it has the potential to save a lot of time on projects and might even make it possible to show information in a different way than was previously possible.

In my opinion, this is typical of the way Autodesk Revit is evolving. It may not be revolutionary, but it does have a meaningful impact on the everyday tasks carried out in Revit.

If you would like to learn more about Autodesk Revit 2023, please contact us at SYMETRI on 0345 370 1444 or email us on info@symetri.co.uk.


Tuesday, 9 August 2022

Design in Manufacturing Autodesk Fusion 360 Training Fast Track Your Process; Enrich Your Value

All software solutions go deep. They offer features that many users don’t explore. Fusion 360 has a lot to offer. Investigate the extensive range of capabilities, and you’ll find the hidden potential in your task, project, and skills.

Knowing where to look

Autodesk Fusion 360 comes with a ‘how to’ guide. You can also go to the Autodesk product documentation portal to discover more functions, tips and use cases. It’s an approach that adheres to the motto – ‘Read the Manual’. Manuals are great. They get you in the zone, introduce the tools, and give you all you need to know about how to start.

Part of my role is acting as a guide for those learning about Fusion 360. Symetri’s Advanced Manufacturing Team comprises Autodesk Certified, experienced design software professionals undertaking Fusion 360 training. Collectively, our role is not just to help you get the best out of Fusion 360 but also to get the most out of it. Symetri is an Autodesk Authorised Training Centre, so you’ll know you’re in safe hands.  


The problem with ‘Fit-for-Purpose’

Using any tool—from the humble chisel and hammer through to software of any description in any business—can take you in one of two directions. The first is that it gets the job done. The second is that it acts as a catalyst for your talent, experience, skills, and vision.  

Michelangelo’s David was a block of marble to start with. It became one of the most famous works of art because Michelangelo took a hammer and chisel to the block. Using Fusion 360 because it’s ‘fit for purpose’ is okay. It will enable you to work faster and achieve more, collaborate more, avoid errors, and anticipate outcomes.

From enablement to empowerment: The value of Fusion 360 Training

Using Fusion 360 as a ‘basic’ tool will preclude potential you may never even be aware of unless you explore. That’s what Symetri Fusion 360 Training does, built around the requirements of roles such as product designer, engineers, manufacturing or mechanical specialist and machinists. Other roles benefit, too, wherever Fusion 360 comes into play.

The spread of roles, and hence the breadth of the relevance of the course, is important to note. A variety of professionals correlates precisely to the headline benefit of Fusion 360— that it does not recognise silos or, instead, it does in its very purpose, but it brings them together, merges them. It enables each specialist to collaborate with all the others. It allows everybody to help each other as the project progresses, rather than waiting until one contributor has performed their function and then passes the drawing or model on to the next. In doing away with siloes, Fusion 360 does away with wasted time, duplication, false starts or re-thinks.

Here’s an overview of areas of training you may want to consider, starting with the essentials and then moving in the direction that most appropriately addresses enhancements to your specific workspaces… 

 Fusion 360 Essentials

Symetri’s introductory two-day course focuses on equipping you with skills to get the most out of Fusion 360. This is the core of the Fusion 360 Training portfolio, to which, once completed, you can add your own flair. You can add a day to the core course for bespoke training. This is to explore your workflow/s, processes, parts, drawings etc.

In Fusion 360 Essentials, we guide you through basic parametric design and other key features across the workflows that may prevail in your business, such as animation, motion study and assembly techniques.

The course is like ‘reading the manual’ on steroids. It goes from a fit-for-purpose approach to looking closely at what the purpose may be—what you want to achieve, what your aspirations are for bringing further efficiencies, and a touch of magic, into your practices.

Any course can be classroom-based or virtual; for groups no larger than six individuals to make it possible for everyone to engage with the trainer and with other delegates.

Explore the full agenda here of Fusion 360

Beyond essentials

Depending on what you want to achieve in your business, our Fusion 360 advanced manufacturing courses include (but are certainly not limited to):

These advanced courses are not just ‘beyond essentials’; they deliver skills you won’t find much (if any) guidance on in standard online product training or any Fusion 360 forums. Our Advanced Manufacturing Team have experience in each specialist area of functionality within Fusion 360. They adopt a pragmatic approach in ensuring you’ll get greater skills value from Fusion 360, which is truly aligned with how your processes work today and how you want to make them work better, more productively, and more relevantly for you in the future. A complete run-through of the portfolio can be found here.

If you want to find out more about how much more you can do with Fusion 360, please contact Symetri. 

Contact us

By via email info@symetri.co.uk or telephone 0345 370 1444.


Thursday, 28 July 2022

What is a Common Data Environment and Why Does It Matter?

We are pleased to share this blog post from our Partner Autodesk.

Throughout the course of any project requires the creation and sharing of untold data during the lifecycle of the project. Unfortunately, a lot of teams have trouble successfully managing and distributing this knowledge. Companies without a framework will unfortunately suffer from bad management, resulting to errors, rework, missed deadlines, cost overruns, bruised feelings and even litigation. Alternatively, there are ways to resolve construction’s data overload, including creating a standardised way of structuring data and collaboration, or more specifically, by adopting a common data environment (CDE) with Autodesk Construction Cloud.

The below infographic explains what a common data environment is and why you should care:


Defining a Common Data Environment  

Autodesk Construction Cloud brings together all your construction project data, workflows, and teams into one common data environment. ‘The common data environment (CDE), is the single source of information used to collect, manage and disseminate documentation, the graphical model and non-graphical data for the whole project team,’ explains the BIM Wiki. ‘Creating this single source of information facilitates collaboration between project team members and helps avoid duplication and mistakes.’ 

To put it in another way, a common data environment is a digital hub where information comes together as part of a typical building information modelling (BIM) workflow. It was originally created and made well known as part of the UK BIM Level 2 standards. It now goes beyond BIM data and information, and it can incorporate anything from project contracts, schedule, change orders and more. 

Basically, if it incorporates information produced during a project, it is accessible to everyone who is granted permission. However, there are certain significant obstacles that make it difficult for companies to develop a CDE for their projects and businesses. 

Current Challenges in Today’s Construction Software Ecosystems 

The thought of a shared data environment is enticing; however, most construction teams often find their working conditions to be less than optimal. Due to several current obstacles, execution of projects without silos and with seamless collaboration across specialties is harder to achieve. These include:

·         Technologies that don’t talk to each other: To achieve the common good, different pieces of software must work together, however that doesn't happen all too often on construction projects. While each piece of software could have a different purpose or benefit, they don't matter much if the information is not shared and integrated across platforms or channels.

·         No central hub: Without a central hub, a project information becomes unreliable and unactionable when software systems aren’t integrated. Without a single source of truth, information can become muddled, opinions might start to outweigh facts, and a project would end up going over budget and behind schedule.

·         Loss of data: Project information must be transmitted from team to team and from phase to phase. These goes without carrying several risks, including the potential of file incompatibility, loss of detail, and mistakes due to manual processes. For these reasons, it is clear why more than 95% of project data captures is being wasted.

  • Inconsistent workflows and processes: Processes and workflows are frequently decided upon by individual project teams and stakeholders. As a result of the fact that different jobs usually require different workloads and processes, the problem is made worse when systems cannot communicate with one another. Misinformation, confusion, and potential conflicts are the results of all of this.
  • No standardisation: When workflows and procedures are different, the standards by which they are carried out and evaluated also vary. Leading to siloed standardisation, which in turn means that some departments may deem a project to be successful, while others may disagree.  

·       Disconnect with the company culture: Large-scale technology and data initiatives that lack direction and buy-in from leadership frequently fail. A foundation for connected construction must be established within a company’s culture to thrive, including shared processes, workflows, standards, and data access.

·        Lack of trust:  Confusion, duplication, and missing information can be frustrating, resulting to people looking for someone to blame. This eventually leads to blaming the software when there is no one to blame.

 A common data environment, fortunately, goes a long way toward solving many of these challenges.   

Why adopt a common data environment?   

Built by the leader in design software, Autodesk Construction Cloud brings all project data starting in design into one common data environment. Including model and asset data that can be used for design reviews, identify constructability problems and to jumpstart building operations. There are many other compelling reasons to implement a common data environment on construction projects including:

  • Enhances collaboration: When utilised properly, digital technologies may improve collaboration. This implies that all project data and information need to flow into and be updated in one centralised system. Leading to improved coordination and teamwork, both internally and across teams as a result of this.
  • Creates a single source of truth: Do not underestimate the power of one single source of truth on a project. One reliable place for team members to access real-time plans, changes and data leads to better decision-making and insight across projects.
  • Improves efficiency and quality: The chance of input errors and data loss is reduced by eliminating the need to manually recreate data, common data environments. This results in teams having better access to information throughout the entire company.
  • Lowers risk: CDE can lower risks with better transparency and understanding of the full project landscape. This eventually makes it possible for ongoing improvement and predictability.
  • Strengthens security: Administrators and IT specialists have better control over data and information with a CDE, which creates more security.

 Attributes of a Common Data Environment 

It is critical to know how to spot a common data environment. Some construction companies believe they have a common data environment; however it can be lacking important features that are needed to reap the benefits of CDE’s.

An effective common data environment has the following attributes: 

  • Easy to Use: An essential component of a common data environment is user experience. To be effective, it needs to be easy to use.
  • Accessible: Cloud-based implies that anyone who needs the information may access it - whether they are in the office or out on a jobsite.
  • Integrated: A CDE must work with current systems and processes. The objective is to break down silos and boost overall collaboration. 
  • Standardised and Scalable: Businesses of any scale should be able to standardise workflows and procedures with a CDE.
  • Secure: Data is never compromised in a well-functioning common data environment. A CDE is secure for confidential business documents and information. 

 Questions to Ask When Considering Implementing a CDE 

It is crucial to not just jump blindly into a new system. When implementing a common data environment, it is important to consider the following:  

·         How do you build company buy-in?: To ensure the success of your business and projects, it is important to address this question before establishing a common data environment. Consider areas and projects where you might execute trial programmes to demonstrate their efficacy if getting staff buy-in seems difficult. Remember that selecting a CDE that is simple to use will enhance the technology's uptake.

 ·         Where should you start the rollout?: It is challenging to deploy a new technology or system fully at once, however doing so can cause conflict. Therefore, it's crucial to consider whether this starts at the leadership level or the field level for your business. The greatest strategy is to take things one step at a time.

  • How are you going to standardise?:  A common data environment cannot be introduced without standards. Which workflows and processes will you introduce first and where can standardisation be most useful and powerful? These questions are crucial to build a successful foundation on CDE.
  • Will there be an administrator to manage this?: Start establishing roles within your business before you consider creating a CDE.
  • What does your roadmap look like?: Creating a CDE helps in laying the groundwork for the future. It's important to address things like how you define success and what your long-term goals are.

A common data environment for today and tomorrow 

Make sure that no data is overlooked. By enabling your team to optimise and use the information when it matters most, a common data environment puts your business and projects in the best possible position for success. Even better, reliable data may accelerate project delivery by enabling future technologies like AI and machine learning. To ensure that your approach to projects and collaboration stays robust from design through operations, adopt a common data environment with Autodesk Construction Cloud.

Want to learn more about how you can develop a CDE with Autodesk Construction Cloud to benefit your business? Please get in touch with us at Symetri by emailing us at info@symetri.co.uk or call us on 0345 370 1444.


What’s New in AutoCAD Electrical 2025

This blog will examine what’s new in AutoCAD Electrical 2025. Automatic Reports Enhancement In AutoCAD Electrical 2025, you can now cre...